TARS-AI is in the early stages of development. You may expect rapid changes to the platform.
May be out of date or incomplete. Always confirm on our Discord for the most up-to-date information.
Software Setup
TARS-AI is powered by a modular software stack designed for real-time speech, vision, and motor control. Follow these instructions to install and set up the TARS-AI environment on your Raspberry Pi.
Minimum Hardware Prerequisites
- Raspberry Pi: Required for running the setup.
- USB Microphone: For user input.
- Speaker: For TARS output.
If you don’t already have Raspberry Pi OS installed, follow this video guide to install Raspberry Pi OS using the Raspberry Pi Imager.
Environment Setup and Installation
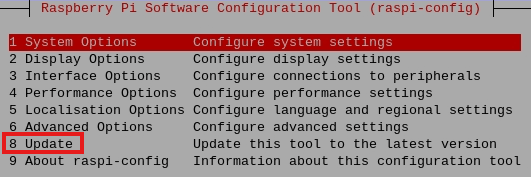
Configure Raspberry Pi
- Open a terminal and run:
sudo raspi-config - Update the configuration tool through
Update.
- Under
Interface Options, enableVNC,SPI, andI2C. - Set audio settings under
Advanced Options→Audio Config→Pipewire. - Reboot the system:
sudo reboot
Note: If you need extended help, refer to the Raspberry Pi I2C setup guide.
Install and Configure LCD-show
- Clone and install the LCD-show driver:
git clone https://github.com/goodtft/LCD-show.git
cd LCD-show
chmod +x LCD35-show
sudo ./LCD35-show
This configures a 3.5-inch 480x320 LCD.
-
Modify boot configuration for HDMI resolution with VNC:
sudo nano /boot/config.txtAdd or update:
hdmi_force_hotplug=1 hdmi_group=2 hdmi_mode=82 # 1920x1080 resolution framebuffer_width=1920 framebuffer_height=1080 -
Modify boot configuration for screen rotation:
sudo nano /boot/config.txtAdd:
dtoverlay=tft35a:rotate=270 -
Restart the system:
sudo reboot
Touchscreen Calibration
- Install the Calibration Tool
sudo apt-get install xinput-calibrator- Run the Calibration Tool
xinput_calibrator Touch the targets as instructed. The tool will generate calibration offsets.
- Save the Calibration Data Copy and Paste the calibration data and save the file. Save the output data to a configuration file:
sudo nano /usr/share/X11/xorg.conf.d/99-calibration.conf - Reboot
sudo reboot- Verify Calibration Interact with the desktop to ensure accurate touch. If needed, rerun the calibration tool or manually adjust the values in 99-calibration.conf.
Clone the TARS-AI Repository
- Open a terminal on your Raspberry Pi.
- Clone the TARS-AI repository:
sudo apt install python3-venv -y git clone https://github.com/TARS-AI-Community/TARS-AI - Navigate to the cloned directory:
cd TARS-AI
Install System Dependencies
To ensure smooth operation, use the included install script.
- Update your system:
sudo apt update sudo apt upgrade -y - Update script permissions:
chmod 777 Install.sh - Allow the script to be executable:
chmod a+x Install.sh - Run the provided script:
sudo ./Install.sh - Fix permissions:
sudo chown $(id -u):$(id -g) .env
sudo chown $(id -u):$(id -g) src/config.ini
Connect Hardware
- Microphone: Plug a USB microphone into your Raspberry Pi.
- Speaker: Connect an external speaker via audio jack or Bluetooth.
Install Audio AMP
-
Edit the boot configuration file:
nano /boot/config.txt -
Add the following lines at the end of the file:
dtparam=audio=on dtoverlay=hifiberry-dac dtoverlay=i2s-mmap -
Install required dependencies and setup I2S amplifier from the TARS-AI Folder:
source src/.venv/bin/activate
sudo apt install -y wget
pip3 install adafruit-python-shell
wget https://github.com/adafruit/Raspberry-Pi-Installer-Scripts/raw/main/i2samp.py
sudo -E env PATH=$PATH python3 i2samp.py
⚠️ DO NOT run audio in the background, as it will break VAD (Voice Activity Detection) and RMS (Root Mean Square) processing.
-
Reboot the system:
sudo reboot -
After rebooting, activate the environment and re-run the setup script from the TARS-AI folder:
source src/.venv/bin/activate (if not already activate) sudo -E env PATH=$PATH python3 i2samp.py -
Test the speaker output:
- When prompted, say yes to the speaker test and listen for sound.
- If the audio sounds distorted, reduce the volume using
alsamixer.
-
Enable volume control in Raspbian Desktop or RetroPie:
- Reboot the system again:
sudo reboot - After the second reboot, open
alsamixer:alsamixer - Use the arrow keys to lower the volume (50% is a good starting point).
- Reboot the system again:
-
If audio issues persist:
- Re-run the
i2samp.pyscript. - When prompted, choose N (disable) for the
/dev/zeroplayback service.
- Re-run the
Configure API Keys
To enable LLM and TTS functionality, configure your API keys.
- Edit the
.envfile and replace"your-actual-api-key"with your valid keys:# LLM API Keys OPENAI_API_KEY="your-actual-openai-api-key" OOBA_API_KEY="your-actual-ooba-api-key" TABBY_API_KEY="your-actual-tabby-api-key" # TTS API Keys AZURE_API_KEY="your-actual-azure-api-key"
Get Your API Keys:
- OpenAI API Key
- Azure Speech API Key (FREE)
- Make sure to create a Free Azure account Free Azure Signup
- Follow all the steps in the video up to
Install Azure speech Python package.
Set Up Configuration Parameters
- Open
src/config.iniand update the LLM settings:[LLM] llm_backend = openai base_url = https://api.openai.com openai_model = gpt-4o-mini - Update the TTS (Text-to-Speech) settings:
[TTS]
ttsoption = azure
azure_region = eastus
tts_voice = en-US-Steffan:DragonHDLatestNeural
Run the Program
- Navigate to the source directory:
cd src/ - Start the TARS-AI assistant:
python app.py - TARS-AI is now running! Speak into the microphone and listen to responses from the speaker.
(Optional) Home Assistant Integration
TARS-AI can integrate with Home Assistant to enable smart home automation via voice commands.
The Home Assistant integration allows TARS to:
- Process voice commands and trigger smart home actions.
- Interact with connected devices (lights, thermostats, security systems, etc.).
- Leverage Home Assistant’s Assistant API to send prompts and execute actions.
To enable this integration, TARS-AI must be configured to communicate with your Home Assistant server.
Prerequisites
Before setting up integration, ensure:
- Home Assistant is installed and running on your local network.
- TARS-AI is fully set up on your Raspberry Pi.
- A Home Assistant long-lived access token is generated.
Configure Home Assistant in config.ini
- Open
src/config.iniand locate the[HOME_ASSISTANT]section. - Enable the Home Assistant module and configure the connection URL:
[HOME_ASSISTANT] # HA Module enabled = True # If set to False, the Home Assistant module will be disabled. url = http://homeassistant.local:8123 # Example: http://192.168.2.5:8123 # URL to access Home Assistant (set Token in .env file!). - Adjust the URL if your Home Assistant is running on a different address.
Generate and Add the Access Token
TARS-AI needs a long-lived access token to authenticate with Home Assistant.
- Log into Home Assistant.
- Click on your User Profile (bottom left corner).
- Scroll down to the Security section.
- Locate “Long-lived access tokens” and click “Create Token”.
- Enter a name for your token and click OK.
- Copy the token immediately, as it won’t be visible again.
Store the Access Token in .env
- Open the
.envfile in your TARS-AI directory. - Add your Home Assistant Token:
HA_TOKEN="INSERT-YOUR-TOKEN-HERE" - Save the file.
Restart TARS-AI to Apply Changes
- Navigate to the
src/directory:cd src/ - Restart the application:
python app.py
Now, TARS-AI can control smart home devices with voice commands! 🎤🏠
Next Steps
Now that you’ve connected to your TARS-AI for the first time, it’s time for testing and your first run.
Documentation Contributors: @alexander-wang03, @pyrater